the TinyBit game engine - part 3 - scripting
The most important thing about a game engine is how you actually talk to it. Like most engines, TinyBit uses an existing programming language with its own custom framework wrapped around it. The big question: which language?
I considered multiple options before picking one. After some quick googling (and by "quick" I mean several hours of reading documentation and forum arguments), I found two solid contestants:
- Wren - A small, class-based scripting language designed specifically for embedding in applications.
- Lua - The venerable lightweight scripting language that's been powering everything from World of Warcraft addons to NASA Mars rovers.
Both languages embed easily in C code and can run on hardware so limited it makes a potato look like a supercomputer. Ultimately I chose Lua because it's much easier to find support online. Lua is incredibly popular in the homebrew gaming scene thanks to Roblox and PICO-8. As of writing this, TinyBit doesn't support Wren, but I wouldn't be surprised if it ends up supporting both eventually.
Side note: Roblox actually uses a derived version of Lua called Luau. It adds nice things like compound assignment (+=, -=) and various optimizations. But I wanted the plain Lua experience, quirks and all.
Speaking of quirks, this brings us to the great Wren vs Lua personality clash. Wren feels familiar and sensible - it has zero-indexed arrays like any civilized language, proper object-oriented programming, and syntax that won't make you question your life choices. Lua, on the other hand, is delightfully weird. It has 1-indexed arrays (because apparently computer scientists in Brazil never got the memo about starting from zero), tables that are simultaneously arrays and hashmaps, and a syntax for function calls that can drive you slowly insane. But here's the thing: Lua's weirdness is consistent weirdness, and once you embrace it, it's actually quite elegant in its own twisted way.
the api
I wanted to keep the TinyBit API as simple as possible. The graphics functions are lifted straight from Processing (see my previous blog post), and the rest is inspired by PICO-8. There's also a set of audio functions that are pretty novel, but I'll save those for an upcoming post where I can properly geek out about sound synthesis.
graphics
The graphics API is intentionally minimal. You won't find fancy shaders or 3D transforms here - just the essentials for making things appear on screen.
-- Display control
cls() -- Clear the display

-- Sprite and image operations
sprite(sx, sy, sw, sh, dx, dy, dw, dh [, rotation]) -- Draw sprite with optional rotation
duplicate(sx, sy, sw, sh, dx, dy, dw, dh [, rotation]) -- Copy display region

-- Basic shapes
rect(x, y, w, h) -- Draw rectangle
oval(x, y, w, h) -- Draw oval
line(x1, y1, x2, y2) -- Draw line

-- Polygon support
poly_add(x, y) -- Add vertex to polygon
poly_clear() -- Clear polygon vertices
draw_polygon() -- Draw the current polygon

-- Colors and styles
fill(color) -- Set fill color (RGBA8888 packed value)
stroke(width, color) -- Set stroke width and color
rgba(r, g, b, a) -- Create color from RGBA components (0-255)
hsba(h, s, b, a) -- Create color from HSBA components (0-255)
As you can see, it's super simple, but it allows you to do some genuinely nice things. The sprite function handles all your basic blitting needs, and the duplicate function is perfect for those moments when you need to copy part of the screen somewhere else - great for creating trails or screen-shake effects.
text output
Another thing I absolutely had to add was easy text output without forcing users to create custom font textures. The problem you quickly run into when working with a 128x128 resolution is that your text needs to be pretty large to be readable, which doesn't leave much room for anything else.
Fortunately, the demoscene and early gaming communities figured this out decades ago with incredibly clever small font designs. I went with a 3x5 pixel font that I modified slightly, adding and removing characters based on what actually seemed useful.
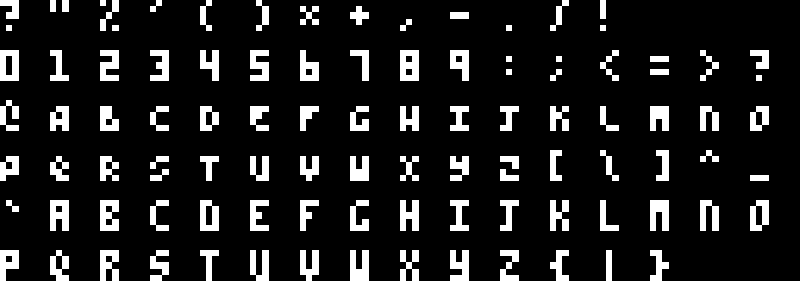
This text can be printed anywhere on screen in different foreground and background colors. There's uppercase, lowercase, and essential punctuation. It's surprisingly readable at this tiny size - a testament to just how much information you can cram into 15 pixels if you're clever about it. The font file is compiled directly into the program as a header file, so it doesn't eat up any of that precious runtime memory.
text(color) -- Set text color
print(text) -- Print text on the screen
cursor(x, y) -- Set the x,y location where to print
inputs
For input, I kept things brutally simple: just 6 buttons. All of them can be pressed simultaneously, which opens up some interesting combo possibilities if you're making a fighting game (or just want to confuse players).
One thing I discovered while developing a small test game was the classic button handling problem. When a user holds down a button, a simple btn(button) call returns true on every single frame. But often you only care about the exact frame when the button was first pressed. I wondered how PICO-8 dealt with this, and unsurprisingly, they ran into the exact same issue. Thus btnp(button) was born - the "p" stands for "pressed", though I like to think of it as "please stop calling me every frame".
Button constants: A, B, UP, DOWN, LEFT, RIGHT

btn(button) -- Check if button is currently held
btnp(button) -- Check if button was just pressed this frame
small utilities
There are a few small utility functions that are simply too useful not to have. Nothing groundbreaking here, just the kind of stuff you end up writing in every project anyway.
millis() -- Get current frame time in milliseconds
random(min, max) -- Generate random integer in range
log(message) -- Print debug message to console
sleep(ms) -- Delay execution (use sparingly)
making a game
Let's look at a simple "game" - a bouncing ball with gravity. It's the programming equivalent of "Hello, World!" for game engines.
-- Simple bouncing ball with gravity

-- Initial values
x, y = 30, 64
dx, dy = 2, 0

-- The _draw function is special - it gets called every
-- single frame by the platform
function _draw()
    -- Clear the screen for each new frame
    cls()

    -- Update position
    x = x + dx
    y = y + dy

    -- Bounce off walls
    if x <= 0 or x >= 120 then
        dx = -dx
    end

    -- bounce of the floor
    if y <= 0 or y >= 120 then
        dy = -dy
    else
        -- Apply gravity when not bouncing off ceiling/floor
        dy = dy + 0.5
    end

    -- Draw the ball
    fill(rgba(255, 255, 255, 255))
    oval(x, y, 8, 8)
end
That's basically it. If you've read this entire post, you now know enough to build games in the TinyBit engine - at least from the scripting side. There are more advanced features like sound effect definition, manual memory manipulation, and exporting shareable game files, but we'll cover those in future posts.
The beauty of this approach is that you can go from idea to bouncing pixels on screen in a few lines of code. No complex build systems, no dependency management, no wondering why your simple rectangle won't show up because you forgot to set up a render pipeline. Just pure, immediate feedback.