the TinyBit game engine - part 2 - graphics
So you're building a fantasy console based on your own engine and arbitrary restrictions. Where do you start? I'd be lying if I said I didn't get a lot of inspiration from PICO-8. I totally did, and that's okay. Even the name of the project TinyBit is inspired by PICO-8 — something small plus a hardware reference. But hey, inspiration is the greatest form of flattery, right?
Anyway, before we can start implementing graphics functions, the first thing we need to figure out is how we want to deal with graphics at all. I've never actually built a game using PICO-8, and I didn't feel like figuring it out now. This was my engine and I wanted to be able to start implementing games ASAP. There's one graphics application that I've used extensively in the past, which is Processing. I first came into contact with Processing when I was discovering Arduinos and development boards in general, since they can interact with processing through the serial interface.
choosing graphics functions
Processing is in my opinion the easiest way to draw simple graphics: point(), line(), rect(), fill(). No abstractions, no display buffers, no sprite objects — very simple. I think this is the perfect way to start with graphics. Any schoolkid could learn this in an afternoon. With just these functions and some basic logic, you can already create some fun projects.
The beauty of Processing is that you don't need to understand rendering pipelines or worry about GPU memory management. You just tell it to draw a rectangle at position (50, 100) and it appears. Want it red? Call fill(255, 0, 0) first. Want a border? Use stroke(). It's immediate mode graphics at its finest.
TinyBit's graphics engine for a large part uses the same set of instructions Processing does. And to be fair, so does PICO-8. The one big difference is the way the two consoles deal with sprites, which come from separate map and sprite buffers in PICO-8, while TinyBit uses a shared global sprite buffer.
picking a resolution
I chose 128x128 pixels for TinyBit. It's small enough to create interesting design constraints while being large enough to avoid frustration. More importantly, sprites are easy to create at this scale. You can sketch a decent character or tile in a 16x16 grid without needing artistic talent (perfect for me).
The square format has no basis in actual retro hardware, but it feels right. Calculations are simple with nice round numbers. PICO-8 happens to use the same resolution, which made comparison easier during development. The main benefit is that everything fits in your head at once — you're never dealing with massive coordinate systems or trying to optimize for different aspect ratios.
what about colors
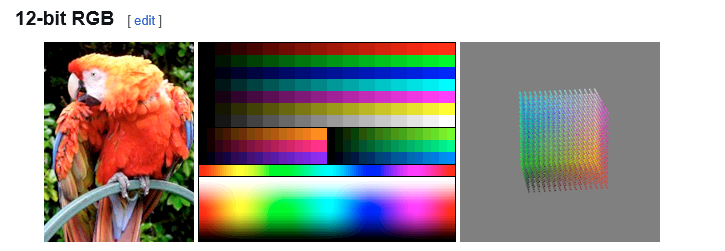
I want to talk about color formats for a moment. (Wikipedia has a mighty interesting page about them). PICO-8 uses a predefined 4-bit color palette with exactly 16 colors. Which seems limiting, but I totally get why they did it: limitation breeds creativity, not to mention saving a whole bunch of memory. For now memory isn't an issue for TinyBit, but I'll get to that in a later post.
PICO-8's approach has benefits. Having a fixed palette means every game has a consistent visual style. Pixel artists work within constraints all the time, and 16 well-chosen colors can produce beautiful art. The palette also includes a weird color substitution method where you can make colors act as transparant during rendering. It's clever, but honestly? I'm not a fan of this approach.
TinyBit uses RGBA4444 instead. As the name implies, it uses 4 bits each for red, green, blue, and alpha channels. This gives you 4096 possible colors instead of 16. More importantly, it allows TinyBit to draw semi-transparent 2D primitives and sprites — something PICO-8 simply can't do — while only using half the memory of traditional RGBA8888.
The alpha channel was a big win. Transparency effects are incredibly useful for game development. Fade-in effects, particle systems, UI overlays — all much easier when you can just set an alpha value instead of manually blending colors or using palette tricks.
Now, if you look at the TinyBit API, you'll notice that it appears to use RGBA8888 everywhere. Internally this always gets converted to RGBA4444. This way users can copy RGB values directly from photo editing software or web color pickers without having to manually convert to 4-bit values. The engine handles the conversion automatically, so fill(255, 128, 64, 200) just works even though it gets stored as 4-bit values under the hood.
The tradeoff is color precision. Going from 8 bits per channel to 4 bits means you lose some gradation. In practice, this rarely matters for pixel art games. The human eye isn't great at distinguishing between colors anyway.
fun with rotations
One of the coolest and most useful features I added that PICO-8 doesn't have is sprite rotation. And it's efficient too, using a special rotation algorithm based on shearing transformations that I discovered in the PICO-8 forums.
The implementation supports arbitrary rotation angles, not just 90-degree increments. This opens up possibilities for things like rotating spaceships, spinning coins, or tilting platforms that would be impossible or extremely cumbersome in PICO-8. Combined with the alpha channel support, you can create some genuinely nice-looking effects with very little code.
Performance-wise, rotating a 16x16 sprite takes about the same time as drawing it normally. There's overhead, but it's minimal enough that you could easily have dozens of rotating sprites on screen without framerate issues.
That covers the core graphics features. The Processing-inspired API keeps things simple, RGBA4444 gives you transparency without memory bloat, and the rotation system opens up new possibilities. Next time I'll dive into memory management and how the spritesheet system works. Spoiler: PICO-8's influence shows up there too.